

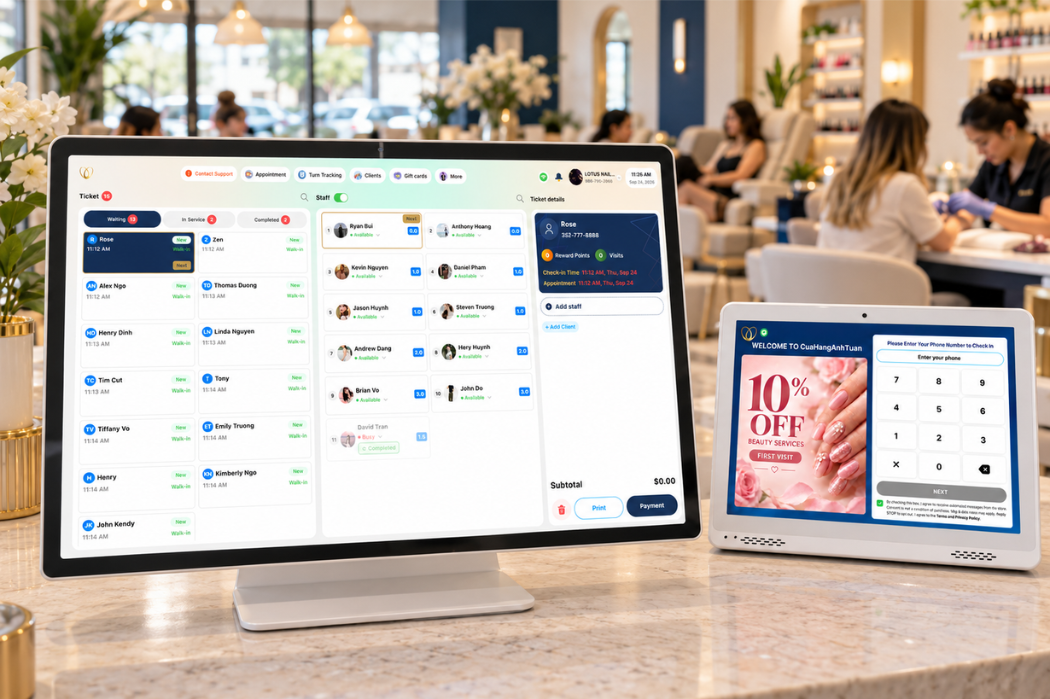
A Senverse POS demo walks nail salon owners through the customer journey—from appointment booking and check-in to technician assignment, service tracking, checkout, and follow-up. Following one sample visit helps you evaluate how these steps connect and what your team needs to review when a customer changes services or requests a specific technician.
This walkthrough follows a sample appointment at a nail salon. It illustrates the workflow described on the Senverse POS system page. The customer and appointment details are hypothetical; the example does not represent a recording of a particular salon’s POS setup.
Senverse POS Demo: Follow One Salon Visit
The Customer Scenario Used in This Walkthrough
A customer books a manicure and requests a particular technician. When the customer arrives, the front desk confirms the appointment and checks them in. During the service, the customer adds a nail repair. At the end of the visit, the receptionist reviews the ticket and completes checkout.
That small change—the added repair—makes the walkthrough more useful than a perfectly straightforward transaction. It gives the salon owner a chance to ask how an updated service appears on the ticket, who is assigned to it, and what the receptionist sees before collecting payment.
What the Front Desk Needs to Track
At each stage, the team needs enough information to answer a practical question:
| Stage | Question for the front desk |
|---|---|
| Booking | Who is coming, when, for which services, and do they prefer a technician? |
| Check-in | Has the customer arrived, and does the booking still match what they need? |
| Assignment | Which technician will perform the service? |
| Service | What work was actually performed, including any changes? |
| Checkout | Does the ticket reflect the completed visit before payment? |
| Follow-up | What visit information is available afterward? |
Senverse describes appointment management, check-in, technician assignment, service tracking, checkout, and customer follow-up as parts of its POS workflow. The sections below show what to examine at each point in a live demo.
Want to review these steps with your own salon’s workflow? Book a Senverse demo and bring a sample appointment, technician request, and service change for the team to walk through.
Step 1 — Book the Appointment
Record the Requested Service, Time, and Technician Preference
Start the demo with a booking for a manicure at a specific date and time. Include the customer’s technician request, because that preference will matter again when the front desk reviews the assignment.
Ask the presenter to show what information staff enter or review for an appointment made online, by phone, or at the salon. Senverse lists all three booking paths on its POS page, but the exact steps may differ by booking path and salon setup.
For a broader checklist of scheduling features to evaluate, review our guide to nail salon booking software before your demo.
The point to check is simple: can staff understand what the customer expects without having to reconstruct the request from separate notes?
Review the Appointment Before the Customer Arrives
Next, look at the appointment as a receptionist would before the customer walks in. Confirm the scheduled time, requested service, and technician preference. If the salon needs to change a detail, ask the presenter to demonstrate how staff would handle that change.
This is also a good place to test a real situation from your salon. For example, ask what staff would review if a customer calls to change a manicure to a longer service. The answer should make it clear how the team checks the schedule before promising the revised appointment.
Step 2 — Check In the Customer
Find and Confirm the Appointment
When the sample customer arrives, have the presenter find the booking and confirm that the customer still wants the scheduled service. This gives the front desk an opportunity to catch a changed request before the technician begins.
Ask to see both the customer-facing check-in step, if it is part of the proposed setup, and what the receptionist sees afterward. Senverse describes Smart Check-In as a way to connect a customer’s arrival to the salon workflow.
Mark the Customer’s Arrival for the Team
The next question is how the team knows the customer is ready. Have the presenter show where the arrival appears and what staff must do before moving to assignment.
If your salon handles appointments and walk-ins at the same time, ask to see how staff distinguish the checked-in appointment from customers still waiting to be served. The demo should use the same mix of customers your front desk manages during a normal shift.

Step 3 — Assign a Technician
Check Availability and Technician Preferences
In this scenario, the customer requested a particular technician. Ask the presenter to show the technician’s schedule and availability before confirming the assignment. If that technician cannot take the customer at the expected time, discuss what the receptionist should check before offering another option.
Senverse describes technician assignment based on schedules, availability, and turn rotation. A live walkthrough can establish how those factors appear to staff in the configuration proposed for your salon.
Review the Turn Before Confirming the Assignment
A requested technician may affect the salon’s turn rules. Ask whether this appointment counts as a turn under your salon’s policy and how staff should record an exception.
The nail salon turn system guide explains the decisions a salon should define for appointments, requested technicians, breaks, and service changes. Bring those rules to the demo so the presenter can show how Senverse would support them.
Step 4 — Create and Update the Service Ticket
Add Services and Assign the Technician
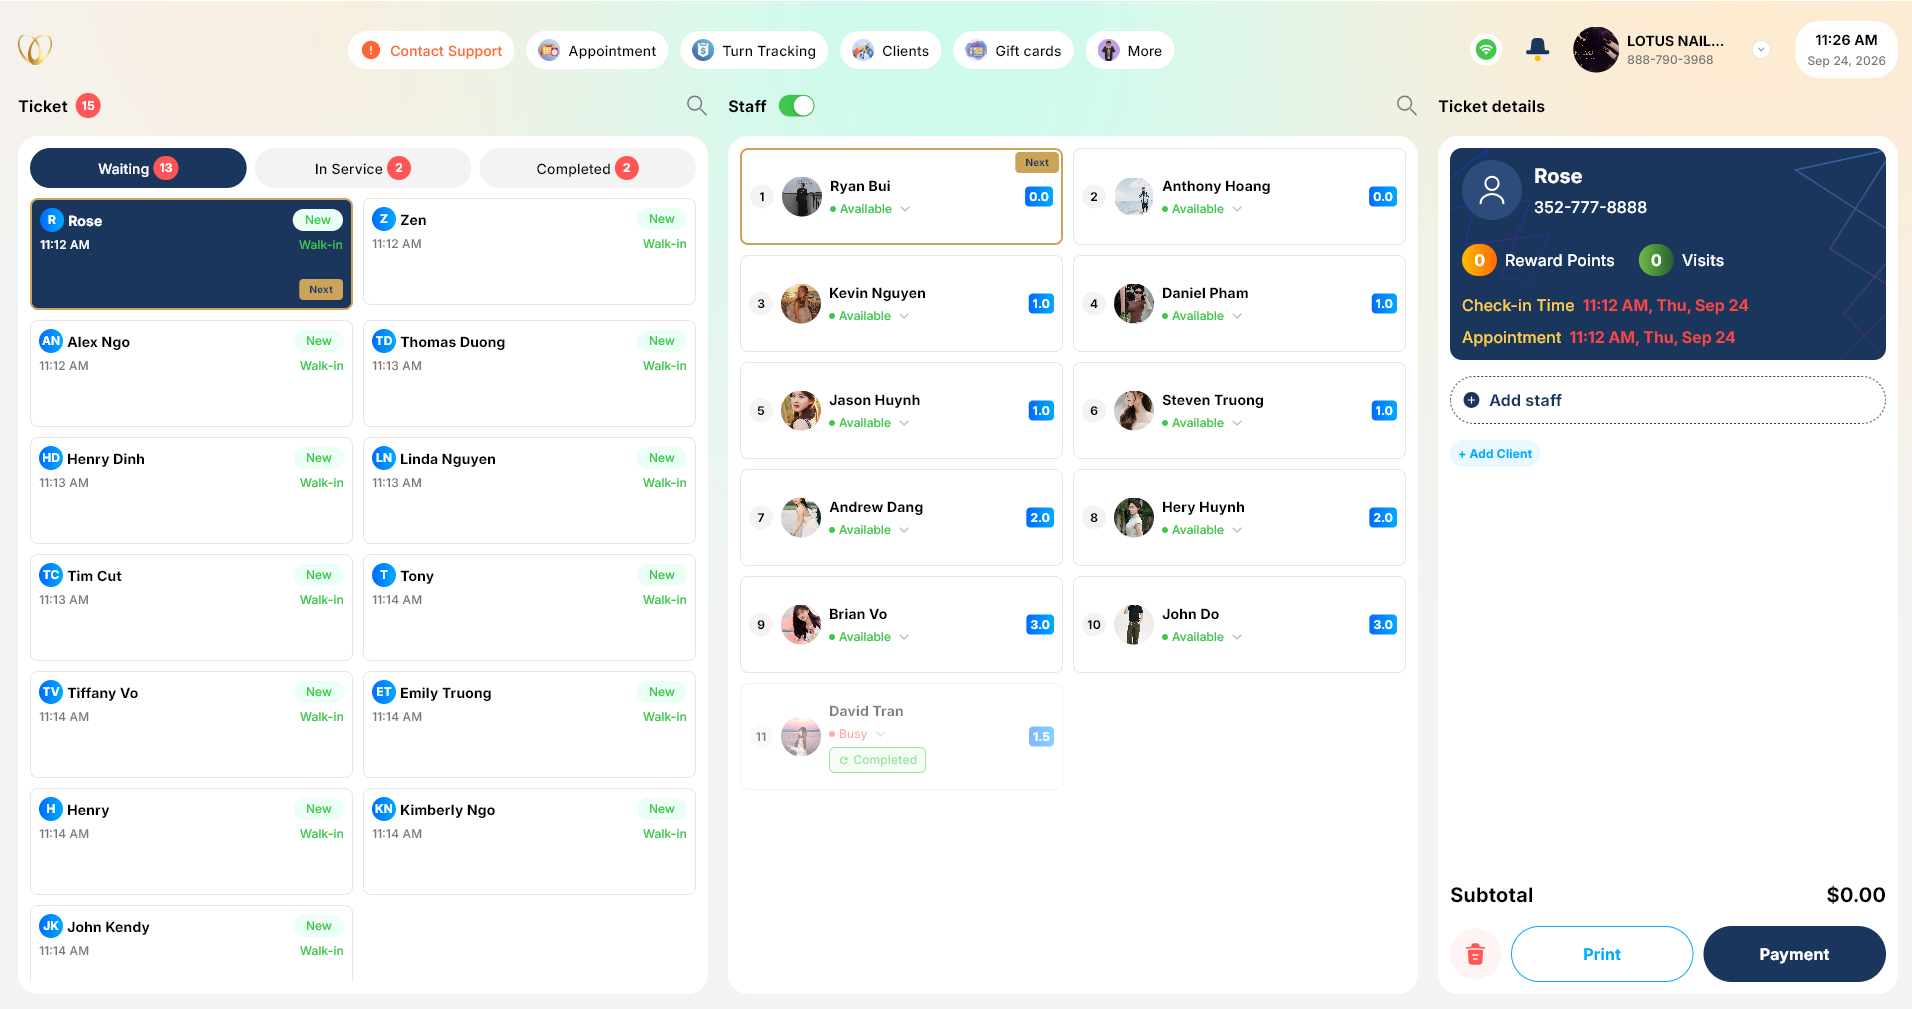
Once the customer begins the manicure, follow the service onto the ticket. Ask the presenter to show the listed service, the assigned technician, and how the front desk can identify the ticket when the customer is ready to pay.
Senverse’s service tracking covers selected services, add-ons, assigned technicians, and service progress. During the demo, review how those details appear on the sample ticket and how staff update them when the visit changes.
Record Add-Ons or Changes During the Visit
Now add the nail repair from the sample scenario. Ask who can update the ticket, where the added service appears, and how staff confirm which technician performed it.
Do not skip this step. A checkout total can appear correct while the service details or technician assignment still need attention. If your salon often splits services between technicians, use one of those visits as an additional demo example and review how each service is recorded.
Step 5 — Review the Ticket and Complete Checkout
Verify Services, Adjustments, and the Total
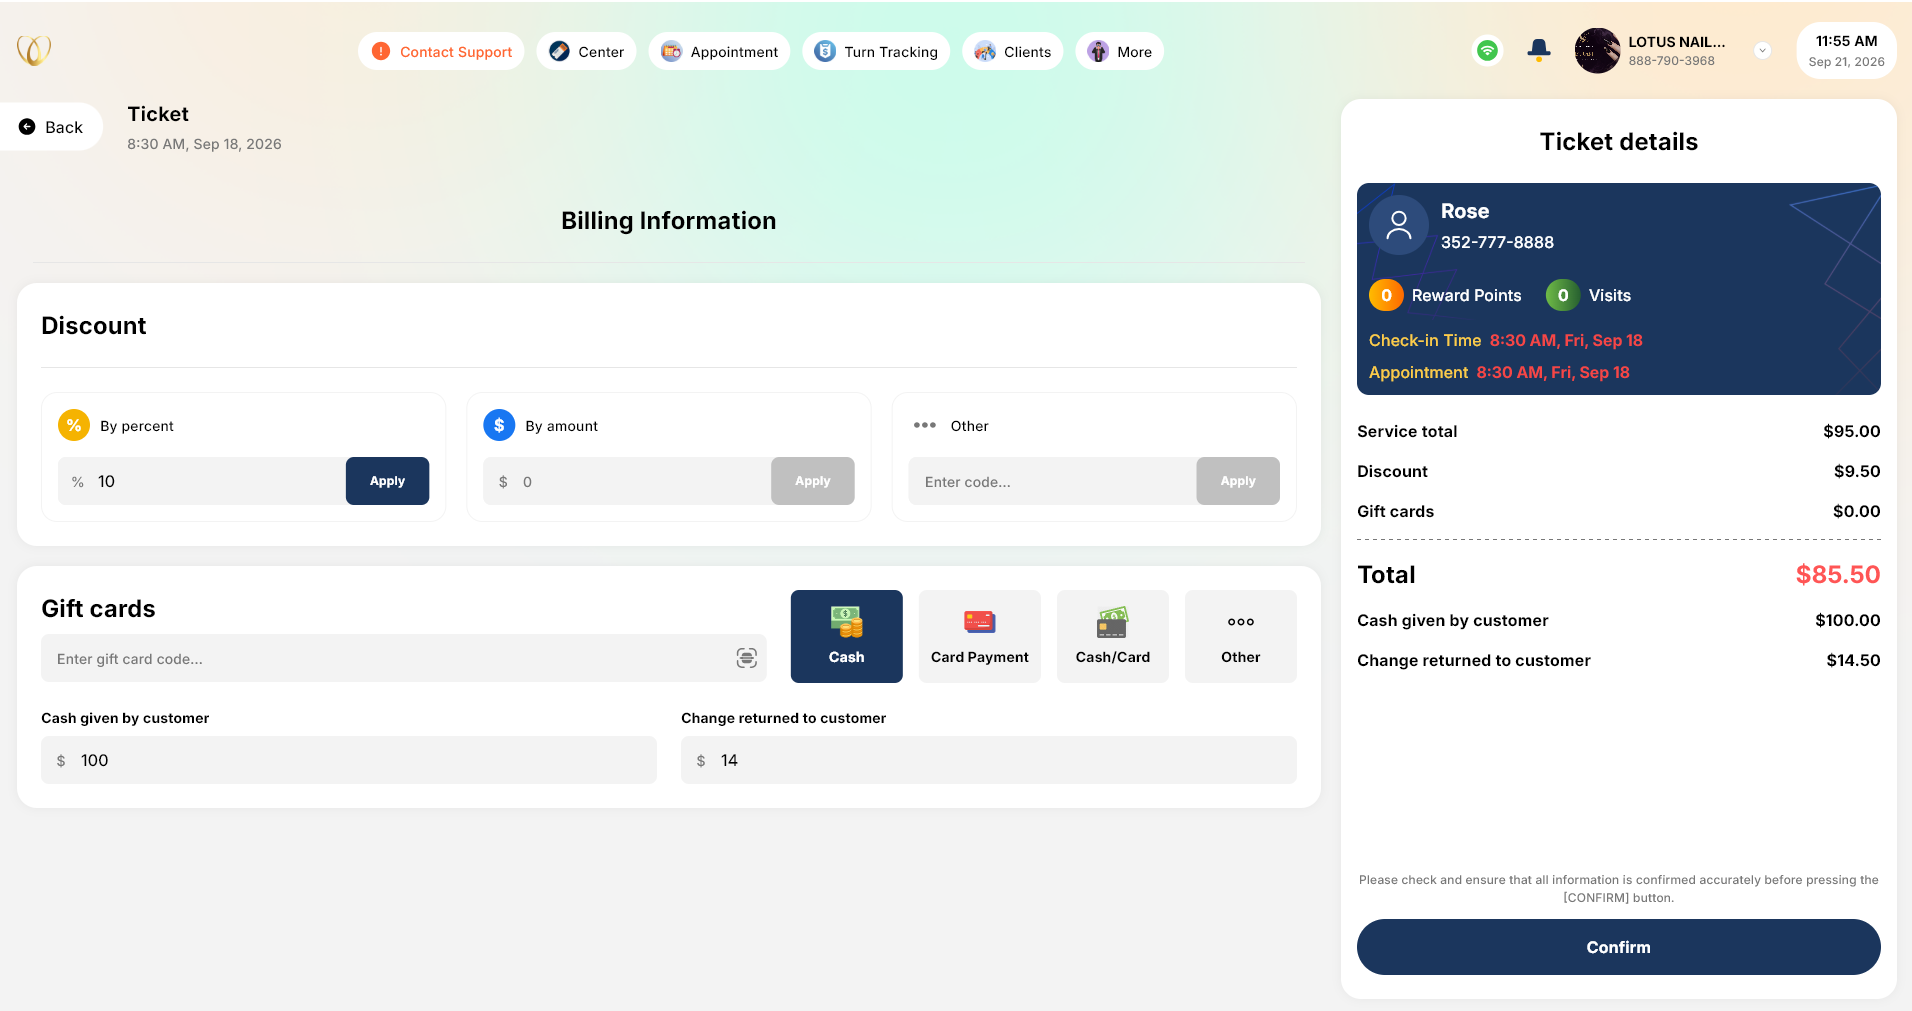
Before accepting payment, have the receptionist review the sample ticket against what the customer received: the manicure, the added repair, the technician assignment, and any applicable adjustment. Ask the presenter to show how a correction is made if something is wrong.
Senverse says its checkout workflow supports payments, tips, discounts, and digital receipts. Use the demo to confirm the steps and options relevant to the plan and payment setup being proposed for your salon.
Complete Payment and Record the Transaction
Complete the sample checkout using a payment method your salon regularly accepts. Then ask where staff can see that the transaction was completed and how they would locate it if the customer has a question later.
If your salon uses cash, card, gift cards, tips, or split checks, ask to see the relevant cases separately. The POS page lists support for these payment and checkout needs, while a live demo can show their actual steps in your setup.
Step 6 — Review the Completed Visit and Follow Up
Check the Visit and Transaction Record
After checkout, ask the presenter to find the completed visit. Confirm what staff can review about the services, assigned technician, payment, and customer history.
This step matters when a customer calls later about a charge or asks what service they received on a previous visit. Senverse describes customer profiles and service history as part of its customer management tools.
Review Available Customer Follow-Up Options
Senverse’s POS page describes follow-up messages, review requests, rewards, and appointment communication. Ask which options are included in the proposed setup, what triggers each message, and how staff can review the communication before using it.
For the sample visit, the demo can end by showing the available follow-up options. A salon should decide which messages fit its customer experience and verify the configured timing and wording before enabling them.
What to Ask During Your Senverse POS Demo
Ask to See a Standard Appointment From Start to Finish
A feature list tells you what a system is intended to support. A complete visit shows how your staff would use it. Ask the presenter to begin with the booking and continue through check-in, assignment, service changes, payment, and the completed record.
Keep track of any step that requires your team to change its current process. That gives you a useful list for staff training and setup discussions.
Test a Walk-In, Service Change, and Technician Request
After the standard appointment, test three common variations:
- Walk-in: How does the front desk add a customer who has no appointment and review who can serve them?
- Service change: What happens when the customer adds or changes a service after check-in?
- Technician request: How does staff handle the request when it affects availability or the salon’s turn rules?
Ask the presenter to show these situations in the product rather than only describing the intended outcome.
Confirm Which Steps Match Your Salon’s Workflow
Use this checklist during the demo:
- Can our team find the information it needs at each handoff?
- Where do staff correct an appointment, assignment, or ticket?
- How are exceptions handled when a customer changes plans?
- Which turn rules must our salon decide before setup?
- Which checkout and follow-up options are included in the proposed configuration?
- What will our front desk and technicians need to learn before launch?
Write down any unanswered question and request a follow-up demonstration of that specific step.
See Your Salon’s Workflow in a Live Demo
Bring Your Current Booking and Checkout Process
A demo becomes more useful when it uses your salon’s real operating rules. Bring a sample appointment, your technician request policy, one busy-hour walk-in situation, and an example of a ticket that changes during service. Use fictional customer details when preparing examples.
That lets you evaluate whether staff can move through the entire visit and where your process needs a decision before setup.
Book a Demo With Senverse
If you want to see how this journey would work for your salon, book a Senverse demo. Ask the team to walk through your appointment, check-in, technician assignment, service ticket, and checkout process using the cases your staff handles most often.